I ship my own WooCommerce plugins under the plogins brand, and I see the same pattern in my own stats and in tools that agencies show me: the install count moves, the paid tier does not. The listing gets people to click “Install”. After that, nobody knows whether the user finished setup, saw a result, or deleted the plugin the same afternoon.
This guide is the procedure I use to find out where the drop happens and fix it. It covers WordPress.org plugins and Shopify App Store apps side by side, because the problems rhyme even though the stores differ. Every limit below comes from the platform’s own documentation, linked next to the fact. Where a platform documents nothing, I say so.
If you run a plugin or an app as a product, or an agency with its own tools, this is the work a go-to-market engineer does: listings, onboarding measurement and content that follows the releases.
Why does my WooCommerce plugin get installs but no paying users
Installs measure the listing. Paying users measure everything that happens after it. When the two diverge, the gap sits in one of four places:
- The listing attracts the wrong reader. Tags, search terms or the short description match a query whose intent your product does not serve. Those installs churn because the product answers a different question.
- Setup is too long or too unclear. The user activates the plugin, lands on a settings page with twenty fields, and leaves. On Shopify the same thing happens in the embedded admin screen.
- The first result arrives late. A shipping plugin that only proves itself when the next order comes in has a long gap between install and value. Many users uninstall inside that gap.
- The upgrade has no trigger. The free edition solves the problem well enough, and nothing in the product tells the user when the paid edition would help.
You cannot tell these apart by looking at the install count. You need a handful of numbers, measured the same way before and after each change. That is the first step of the procedure, and most plugin owners skip it.
What should I measure before changing a plugin listing
Write down the current state before you edit a single field. Without a “before” column, any change you make afterwards is an opinion. I keep one table per product and fill it at fixed intervals, for example the four weeks before a listing change and the four weeks after.
Here is the template. The Before and After columns are empty on purpose: fill them with your own data.
| Metric | Where to read it | Definition | Before | After |
|---|---|---|---|---|
| Listing views | WordPress.org plugin page stats, or Shopify Partner Dashboard | Visits to the listing in the period | ||
| Installs | WordPress.org plugin page stats, or Shopify Partner Dashboard | New installs in the period | ||
| Same-day uninstalls | Shopify Partner Dashboard; for WordPress, your own deactivation event | Installs removed within 24 hours of install | ||
| Setup started | Your analytics (Umami, PostHog or GA4), event setup_started | Share of installs that opened the setup screen | ||
| Setup completed | Your analytics, event setup_completed | Share of installs that saved the minimum working configuration | ||
| First result | Your analytics, event first_result | Share of installs where the product did its job once | ||
| Upgrade | Your analytics, event upgrade, matched against your billing records | Share of installs that moved to a paid plan | ||
| Feature adoption, paying | Your analytics, feature events filtered by plan | Share of paying users who used each key feature | ||
| Feature adoption, free | Your analytics, feature events filtered by plan | Same, for free users | ||
| Retention | Your analytics, active installs still sending events after N days | Share of a weekly install cohort still active |
Three rules keep the table honest:
- Fix the period length. Four weeks against four weeks. A shorter “after” window flatters a change.
- Change one thing per period. If you rewrite the listing and the onboarding in the same week, you will not know which one moved the numbers.
- Write the definition before you read the number. “Setup completed” means a specific saved state. Decide what that state is first, then count it.
The split between paying and free users in the adoption rows comes from Mat De Sousa, founder of WideBundle, who recommended tracking feature adoption separately for the two groups in an X post on 2 November 2026, alongside same-day uninstalls, onboarding completion and retention. In his view, the features paying users actually use tell you what the paid plan sells. I agree with the split, and I would add one thing: if a feature is used heavily by free users and rarely by paying ones, it is a candidate for the upgrade trigger.
How do I fill in a WordPress.org plugin listing field by field
A WordPress.org listing is generated from your readme.txt. The rules below come from the readme documentation. The right-hand column is what I check in my own readmes before each release.
| Field | Documented rule | What I check |
|---|---|---|
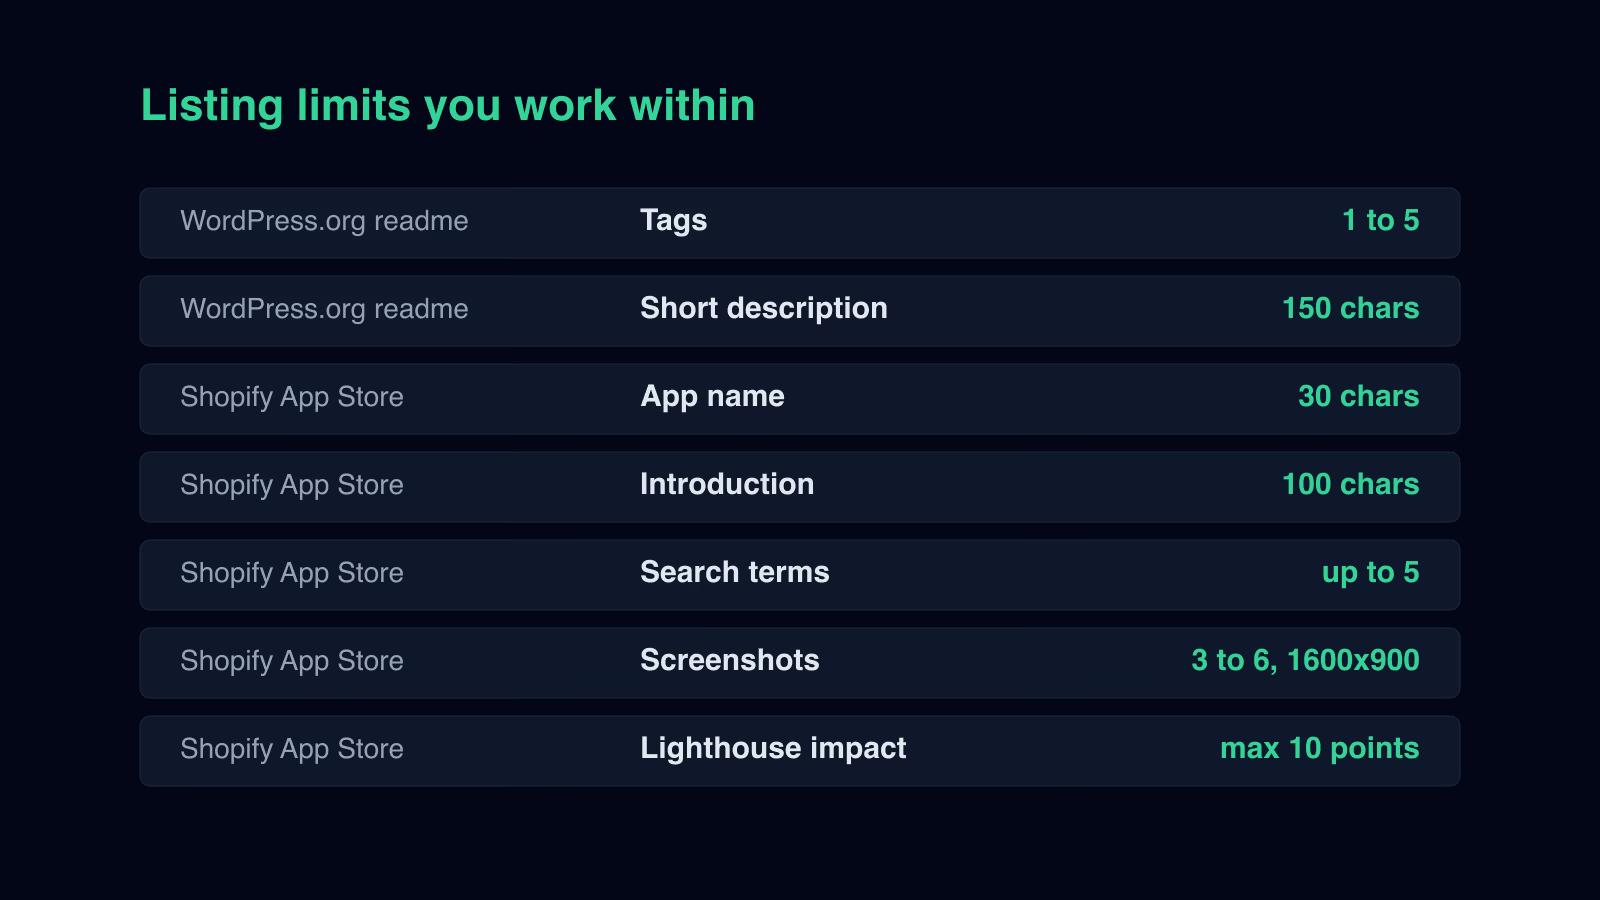
| Tags | 1 to 5, comma-separated | Each tag is a phrase a store owner would type, not my internal feature name |
| Tags | Tags unique to one plugin are not shown | I check that each tag already exists on other plugins; a tag only I use is wasted |
| Tags | No competitor names as tags | No brand names of other plugins, even when users compare us |
| Short description | No more than 150 characters, no markup | It names the problem and the outcome in plain words; no links, no bold |
| Tested up to | Minor versions are ignored | I bump it on each major WordPress release after testing, and I do not expect a minor bump to show |
The short description carries most of the weight because it appears where users compare plugins. I write it as one sentence: what the plugin does for a WooCommerce store, in the store owner’s words. For plogins-customs that means duties, customs paperwork and carrier documents, the terms a merchant shipping outside the EU uses, rather than the name of a regulation.
The long description and the FAQ section of the readme are where you answer the questions that block setup. I move every question that came up in the support forum into the readme FAQ, phrased the way the user asked it. That turns support threads into listing content and shortens the next user’s path to a working configuration.
For more on building the plugin side for WooCommerce stores, see my WooCommerce developer page.
How do I fill in a Shopify App Store listing field by field
Shopify documents far more of the listing than WordPress.org does. All figures in this table come from the Shopify App Store best practices.
| Field | Documented limit or recommendation | What I check |
|---|---|---|
| App name | 30 characters or fewer | The name plus nothing else; no keyword stuffing |
| Introduction | 100 characters | One outcome for the merchant |
| Details | 500 characters | How it works and what the merchant needs to do |
| Feature list | Up to 80 characters per feature | Each line starts with what the merchant gets |
| Integrations | Up to six | Only integrations that work today |
| App icon | 1200x1200, JPEG or PNG | Readable at small sizes |
| Feature image | 1600x900 (16:9), 4.5:1 contrast recommended | Text on the image passes the contrast ratio |
| Screenshots | 1600x900, 3 to 6 desktop | Each screenshot shows a step of setup or a result, in order |
| Feature video | 2 to 3 minutes, screencasts at most 25% of the video | The video shows the merchant problem first, the screencast second |
| Search terms | Up to five, complete words, one idea per term | ”email marketing” works; “email marketing for leads” mixes two ideas |
| Structured features | Up to 25 per category | Every feature the app really has, nothing planned |
| Free plan | Mark one plan as Free to show “Free plan available” | The free plan is real and usable |
| Free trial | 14-day trial recommended | The trial is long enough to reach the first result |
Two more items from the same page change how I plan the listing:
- Translations. Shopify states that translated listings “convert up to 4x better in non-English markets”, and that English primary listings are auto-translated into 8 languages: Brazilian Portuguese, Danish, Dutch, French, German, Simplified Chinese, Spanish and Swedish. I write the English primary listing in short, literal sentences so the automatic translation has less to get wrong, and I check the German and Spanish versions by hand.
- Storefront performance. Shopify asks that apps do not reduce the Lighthouse performance score by more than 10 points. The score is weighted Home 17%, Product details 40%, Collection 43%. If the app injects anything into the storefront, I measure those three page types with and without the app before submitting.
The screenshots and the video are where the onboarding problem from the first section becomes visible. If I cannot produce a screenshot sequence that goes from install to first result in three to six images, the setup is too long, and fixing the screenshots will not fix the product.
If you are building the app itself, my Shopify developer page covers the implementation side.
What does the Built for Shopify badge change for an app
Built for Shopify is the one place where Shopify states that something affects search. According to that page, the status gives:
- a badge on the app card and a highlight in the listing,
- a search filter and a ranking boost in App Store search,
- priority review and targeting in the ads plan,
- eligibility for the homepage and category first collection and for “Picked for you”, which Shopify describes as personalized and not guaranteed.
The criteria cover safety, security and reliability; performance in the admin, and on the storefront or checkout for apps that touch them; ease of use; proven usefulness measured on installs; review count and rating over a rolling window; and a complete listing. The app must be embedded in the Shopify admin.
The process has teeth. Failing the same criterion three times in a row suspends the application for three months. Status is reviewed annually, and an app that falls below a criterion gets 60 days to fix it.
For planning, I treat the criteria as a checklist that overlaps almost entirely with the onboarding work below. “Ease of use” and “proven usefulness” are hard to show without the setup and first-result events, so I instrument first and apply second. Applying early and failing the same criterion repeatedly costs three months.
How do I instrument plugin onboarding to see where users drop
The store dashboards stop at install and uninstall. Everything between those two events has to come from your own product. I send five events, and the names below are my recommended names, not a standard of any platform or analytics tool:
| Event | When it fires | Properties I attach |
|---|---|---|
install | First activation of the plugin or first load of the embedded app | product, version, edition, platform |
setup_started | The user opens the setup screen or wizard for the first time | product, version, step |
setup_completed | The minimum working configuration is saved | product, version, seconds since install |
first_result | The product does its job once (first label printed, first email sent, first rule applied) | product, version, seconds since install |
upgrade | The user moves to a paid plan | product, version, plan, days since install |
The definition of first_result is the important design decision. For plogins-customs, a first result is a customs document generated from a real order. For a bundle app on Shopify it might be the first bundle shown on a product page. Write it down per product, because the event is only as good as that definition.
A minimal WordPress-side sketch looks like this. The endpoint and the option name are placeholders, and nothing is sent until the site owner has opted in:
// Example only: endpoint and option name are placeholders.
function myplugin_track( string $event, array $props = [] ): void {
    if ( get_option( 'myplugin_telemetry_optin' ) !== 'yes' ) {
        return;
    }
    wp_remote_post( 'https://analytics.example.com/api/event', [
        'blocking' => false,
        'timeout'  => 2,
        'body'     => wp_json_encode( [
            'event'   => $event,
            'product' => 'myplugin',
            'version' => MYPLUGIN_VERSION,
            'props'   => $props,
        ] ),
        'headers'  => [ 'Content-Type' => 'application/json' ],
    ] );
}

add_action( 'myplugin_setup_saved', function () {
    myplugin_track( 'setup_completed', [ 'seconds_since_install' => time() - (int) get_option( 'myplugin_installed_at' ) ] );
} );
On a free plugin, I ask for consent on the setup screen, explain what is sent, and keep the payload free of personal data: no emails, no store URLs unless the user agreed to that. On Shopify, the app backend already knows the shop, so the events go server-side from the app itself.
Umami, PostHog and GA4 all accept custom events. I pick one per product and stay with it, because switching tools in the middle of a before/after comparison breaks the comparison. Once the five events flow, the measurement table from the second section fills itself, and the funnel shows which of the four failure points from the first section applies.
Mat De Sousa adds one more argument for this work in the same post: in his experience, merchants install competing apps side by side and keep the one that is fastest to set up. If that matches your category, seconds_since_install on setup_completed is the number to watch.
How do I turn plugin releases into content that brings users
Most plugin owners write a changelog and stop there. The changelog is accurate, short and read by almost nobody. The features in it are the best material for content, because each one solves a specific problem a store owner searches for.
For plogins I publish a machine-readable feature feed at plogins.com/features.json. The file wraps the entries in an object with vendor, count and releases. Each release entry has plugin, name, edition, version, released, url, changelog, wpOrg and a features list where each item has a kind (new, added or changed) and a text. Fixes and security notes are left out on purpose: they matter to users, and they belong in the changelog, but they do not describe a new capability anyone searches for.
This is the real entry for plogins-customs 1.3.0, released on 1 November 2026, trimmed to two of its five features:
{
  "plugin": "plogins-customs",
  "name": "Customs",
  "edition": "free",
  "version": "1.3.0",
  "released": "2026-11-01",
  "url": "https://plogins.com/plogins-customs/",
  "changelog": "https://plogins.com/plogins-customs/changelog/",
  "wpOrg": "https://wordpress.org/plugins/plogins-customs/",
  "features": [
    {
      "kind": "added",
      "text": "Customs Paperwork. Generate printable Commercial Invoice and Customs Declaration (CN22/CN23) slips directly from the WooCommerce order edit screen and order list."
    },
    {
      "kind": "added",
      "text": "Store EORI number setting under WooCommerce > EU Import Duty (Union Customs Code, Reg. (EU) No 952/2013, Art. 9), automatically printed on declarations and carrier export documents."
    }
  ]
}
The procedure that turns an entry like this into content:
- Read the feed after each release. My press workflow pulls new entries and lists features that have not been used in an article yet.
- Map each feature to a problem. “Customs Paperwork” maps to the merchant question of which documents a parcel leaving the EU needs. The EORI setting maps to the question of where the EORI number has to appear.
- Find the article that already covers that problem. If one exists, the feature goes into that article as a paragraph with a link to the plugin. If none exists, the problem becomes a new article.
- Write it in every locale the site serves. I publish in six languages, so the feature lands in six articles, each written for the readers and rules of that language’s countries.
- Link back from the plugin. The plugin’s own page and readme FAQ link to the article that explains the problem, so the reader who arrives from search and the user who arrives from the plugin meet the same explanation.
The feed format matters for two reasons. A script can read it, so the step from release to draft does not depend on someone remembering. And because each feature is one sentence with a kind, I can see at a glance which releases added something worth writing about and which only changed behaviour.
If you want this pipeline wired into your own release process and content system, it is part of what I set up as a go-to-market engineer. The automation side, release hooks and scheduled jobs, is close to the work on my business process automation page.
Can a competitor copy my Shopify app or WooCommerce plugin
Mat De Sousa’s view, from the same post, is that apps which are only a visual layer on top of the store are easy to copy. He suggests two additions that are harder to copy: a service layer, where the vendor sets the app up for the merchant, and a data layer, such as A/B tests and analytics that show the merchant what the app changed.
My own work supports the data-layer half of that argument from the client side. Since 2019 I have run A/B tests, recommendations and dynamic content in Dynamic Yield for e-commerce clients. Merchants who see a test result tied to their own revenue questions ask for the next test. A merchant who only sees a widget asks whether a cheaper widget exists.
For a plugin or app owner, the practical version is small:
- Service layer. Offer a setup call or a done-for-you configuration for the paid plan, and make it visible in the listing and on the setup screen. For plogins-customs, the equivalent is pre-filled tariff and origin settings for a merchant’s catalogue.
- Data layer. Show the merchant one number inside the product that proves the plugin worked: documents generated, duty lines added, emails delivered. That number is also the
first_resultevent from the previous section.
Mat De Sousa also recommends adopting new Shopify features quickly. I read that as a listing argument too: a new platform capability that your app supports on day one is a new search term, a new screenshot and a new feature line.
Does Shopify Sidekick recommend apps from the App Store
Shopify’s Sidekick help page documents that Sidekick can generate custom apps, build Shopify Flow workflows and run multi-step tasks. The page does not say that Sidekick recommends App Store apps.
Mat De Sousa describes it differently from his own use: in his account, Sidekick turns a merchant’s question into keywords and returns 3 to 5 top-ranked apps. That is his observation, and Shopify has not documented it.
Two conclusions hold under either reading. If his description is right, the apps that rank well in normal App Store search are the ones Sidekick shows, so the listing work above applies twice. If Sidekick generates a custom app for a simple need, an app that only covers that simple need competes with a free generated alternative, which brings you back to the service and data layers. Until Shopify documents the recommendation behaviour, I plan no launch around it.
What do WordPress.org and the Shopify App Store not document about ranking
Neither platform publishes the weights of its search ranking. The WordPress.org readme page explains how tags and descriptions are displayed and filtered. Shopify’s best practices explain how to fill each field, and the Built for Shopify page says the status gives a ranking boost in search. None of these pages say how much any field, review or install count weighs.
The Lighthouse weighting on the Shopify best practices page (Home 17%, Product details 40%, Collection 43%) describes how Shopify combines the performance score across page types. It is a performance measure, and none of the three documents link it to search position.
This has consequences for how I talk about results:
- I do not promise a ranking position to anyone, including myself.
- I measure what I can define: listing views, installs, setup completion, first result, upgrades.
- When a listing change is followed by more installs, I report it as a change in the same period, with the before and after values, and I keep the period lengths equal.
Can I send follow-up emails to users who installed my plugin
Messages that belong to the service, such as a license key, a setup confirmation or a security notice about the plugin, are part of running it. Marketing follow-up to a person is a different case, and it is regulated.
In the UK, regulation 22 of the Privacy and Electronic Communications Regulations 2003 covers unsolicited marketing email to individual subscribers. It requires prior consent, with a narrow exception for contacts obtained in the course of a sale or negotiations for a sale, for similar products, where the person was given a simple way to refuse at collection and in every message. Ireland implements article 13 of the ePrivacy Directive 2002/58/EC, which sets the same consent rule across the EU.
In practice, for a free plugin user who never bought anything, I ask for consent at signup with an unticked checkbox and a plain description of what they will receive. For a paying customer, the soft opt-in may apply to related products, as long as the refusal option was there from the first contact.
I run Mautic every day on a subscription platform, and the setup that works is plain: one segment per product and plan, built from the same install, setup_completed and upgrade events, and emails triggered by what the user did or did not do. A user who installed but never fired setup_completed gets a message about the one setting that blocks setup. A user who reached first_result gets nothing about setup at all. This keeps the emails short and relevant, and it means the segments and the measurement table read from one event stream.
What is the order of work for a plugin or app that stalls after install
This is the sequence I follow on my own products and recommend for any plugin or app with installs and no paying users:
- Week 1: measure. Define the five events and the
first_resultcondition, ship the tracking with consent, and fill the Before column of the measurement table from the store dashboard and your analytics. - Week 2: listing. Go through the field-by-field checklist for your platform. Fix tags, short description, search terms, screenshots and the feature list against the documented limits. Change nothing in the product yet.
- Weeks 3 to 6: read the funnel. Let the events collect a full period. Find the step with the largest drop: setup started, setup completed or first result.
- Week 7: fix the largest drop. Shorten the setup, pre-fill defaults, or move the first result closer to install. One change.
- Weeks 7 to 10: measure again. Fill the After column with a period of the same length.
- Every release: content. Add the release to the feature feed, map each new feature to a problem and an article, and update the listing’s feature lines.
- Once the funnel is stable: follow-up. Build the consented email sequences on the same events.
On Shopify, apply for Built for Shopify after step 5, when you can show setup and usefulness numbers instead of hoping the review finds them.
What to do next
Take the measurement table from this article, fill the Before column for your plugin or app with the last four weeks of data, and send it to me together with the link to your WordPress.org or Shopify App Store listing through the go-to-market engineer page. I will return a field-by-field listing review against the documented limits and the one onboarding step I would instrument first.